The Best of the Joy of Painting with Bob Ross
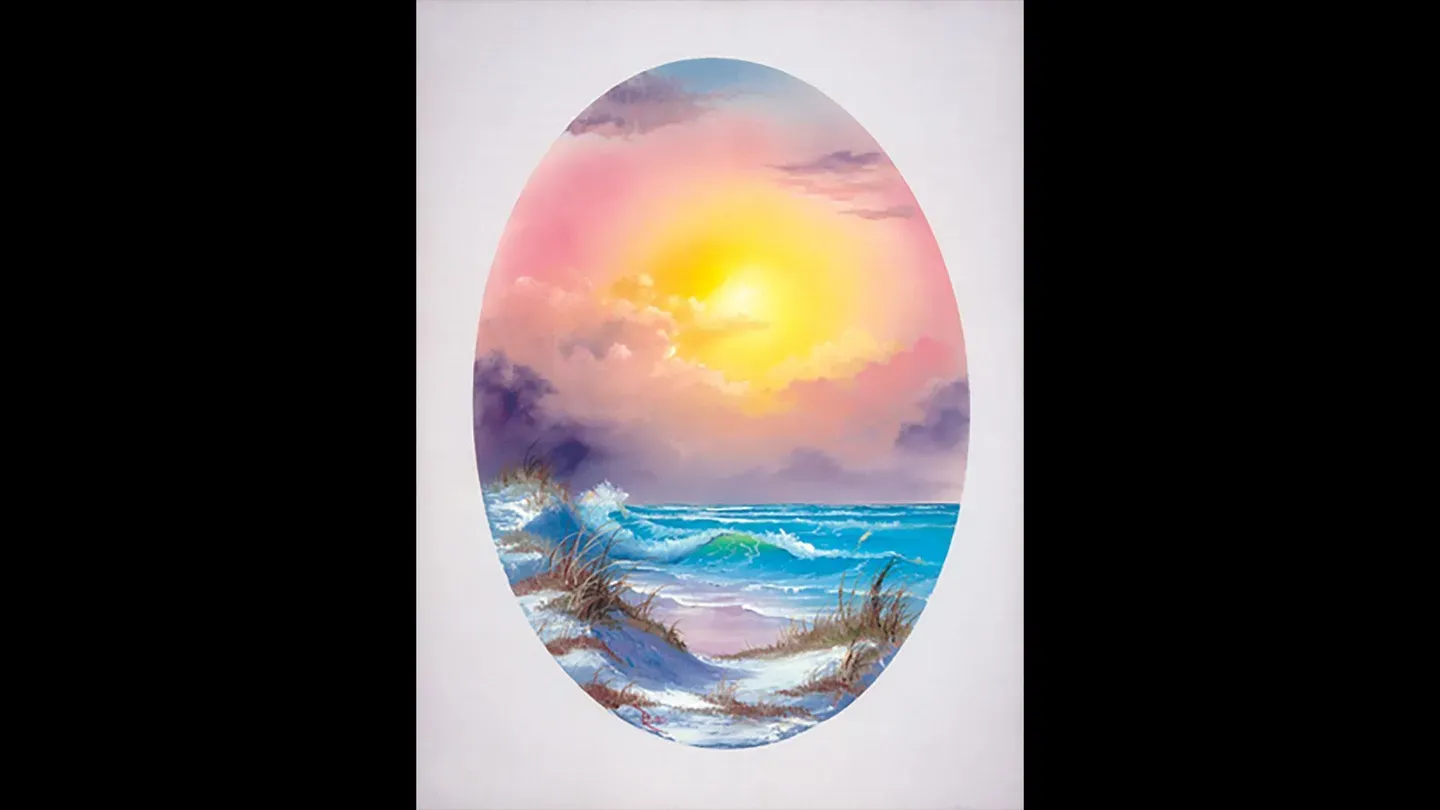
Pastel Seascape
Season 41 Episode 4108 | 27m 28sVideo has Closed Captions
Bob Ross composes a fantastic seashore-in-an-oval.
Bob Ross composes a fantastic seashore-in-an-oval that literally glows with delightful color.
Distributed nationally by American Public Television
The Best of the Joy of Painting with Bob Ross
Pastel Seascape
Season 41 Episode 4108 | 27m 28sVideo has Closed Captions
Bob Ross composes a fantastic seashore-in-an-oval that literally glows with delightful color.
How to Watch The Best of the Joy of Painting with Bob Ross
The Best of the Joy of Painting with Bob Ross is available to stream on pbs.org and the free PBS App, available on iPhone, Apple TV, Android TV, Android smartphones, Amazon Fire TV, Amazon Fire Tablet, Roku, Samsung Smart TV, and Vizio.
Providing Support for PBS.org
Learn Moreabout PBS online sponsorship[Music] Hi, welcome back.
Certainly glad you could join us today.
I thought today we'd do a fantastic little seascape.
So I'll tell you what, let's start out have them run all the colors across the screen, that you need to paint along with us.
While they're doing that, come on up here and let me show you what I've got done already.
I've got my standard old 18 x 24 inch canvas, but you use whatever size is convenient for you.
And today, I've cut a little oval out of some contact paper, and just stuck it on.
And then we covered the whole area here with just a thin, even coat of liquid white.
So it's all wet and ready to go, so, let's just have some fun.
I thought we'd do a little seascape today that's very warm and make you feel good just to look at.
I'm gonna start with the least little touch of the cadmium yellow.
Least, little touch.
Maybe reach over here and get a little touch of the Indian yellow, too just mix those together.
Ooh, that's nice.
Let's go up here.
Now maybe we'll have a little sun up in here in the sky today.
So we'll just start, and go around like this.
There's not a great deal of color on the canvas.
Not much color.
Just work around.
I want a circle right here.
Now I don't just want to go like this, because it's very hard to blend that out.
Little x's, and the paint is continually mixing with the liquid white.
Alright, now, without cleaning the brush, I'm going to add the least little touch of yellow ochre.
And go right around the outside edge.
The yellow ocher is sort of a gold color.
It's very, very pretty color.
Very pretty.
Alright.
And just sorta allow those to blend together.
Okay, now then.
Let's wash the old brush.
That's the fun part, this whole technique.
Okay, shake off the excess, [laughs] and just beat the devil out of it.
Alright, let's go into a little bit of the alizarin crimson.
Just a small amount.
Just a small amount.
And just, tap it right into the bristles.
Let's go up in here, maybe around these edges, we'll put a little of the crimson.
And I'm starting from the outside, and working inward so it'll mix with the liquid white, and progressively it will get lighter, as it works inward.
There, now see these little feather edges that you create by doing this, the little x's.
They blend together quite easy.
If you made very distinct lines, it would be difficult to blend it together.
Let's have a little bit more of the crimson, for the other side, don't want it left out.
There.
Okay.
I thought maybe today we'd just do a very, very simple little ocean scene.
I live in Florida now, and we have a lot of beautiful little ocean areas around there.
In fact just the other day, my friend Bob and I went fishing.
I hooked my first Sailfish.
I'd never, never even seen one before.
And you notice I said I hooked him.
Because he got off long before I got him into the boat.
But we did, before the day was over, catch one that was just absolutely gorgeous.
This thing was probably close to six feet long.
Most beautiful fish I've ever seen.
And you know me.
[laughs] We brought him in the boat just long enough to take his picture, and wish him well, and we put him back in the water.
He went home back to his family, and he's living happily now right off of Fort Pierce.
There.
I don't keep many fish.
I think you oughta return them back to nature, and go back and catch them another day.
Or somebody else catches them.
That way, everybody gets to enjoy the fun of catching a fish.
There.
Okay, now then I'll just go completely across there.
Now up here on the top, I'm going to use the same old dirty brush, add the least little touch of phthalo blue and alizarin crimson, and you can just mix them on the brush.
Maybe a little more crimson, there we go.
But I want this to be to the blue side.
This is this sort of a lavender to the blue side.
And we'll go back up here.
And very gently, very gently we'll just throw in a little color right along the very top.
Sorta let it blend down, very easy.
Now then, I have several of each brush going.
I'm gonna take a clean, dry two-inch brush and just blend these two areas together.
You don't want to be able to tell where one color stops, and the next color starts.
Just let them blend together, that easy.
That easy.
Now then.
I think maybe today we're gonna have some fun, let's take and do a little finger painting, take a little touch of the titanium white, and we just rub in the indication of a little sun right there.
And with a clean brush, very gently blend that.
And it will give the indication of a little sun up here in the sky.
But yet it's not real bright or real distinct.
It's just a quiet little sun that lives up there, and has a good time.
Let's go into a little yellow, a little alizarin crimson, mix 'em together.
Gonna make sorta a nice peachy color.
Maybe a touch more of the yellow.
Okay this is cad and alizarin crimson, that's all it is.
And let's go up in here.
Very warm little painting today, so we're gonna use very warm little colors of course.
And let's take just a little of that, on the fan brush.
Tight little circles, let it go right across the sun there.
We'll draw a little cloud up here in the sky.
Just let it float right on back into nothing here.
There, wherever.
Okay.
Then we'll take a dry two-inch brush and gently, gently blend that.
The only reason I'm doing this is to remove excess paint.
That's the only reason.
Now then, let's go back, I'll take a little white, a little touch of the cad yellow in it, maybe a little yellow ochre also, ooh that's nice.
It's almost white, but it's just flavored with a little cad yellow, a little yellow ochre, just to give it a little flavor.
let's go back up in here.
Now I want to put some little highlights on this cloud.
So using just the corner of the brush, I'm gonna come right in here, and just sparkle a few little things, not too much.
Just a little, just a little, just a little.
Now.
Back to our two-inch brush, or you could use a one-inch brush for this if you're more comfortable with it.
There, and fluff it.
Just enough to put a little flavor up on the top.
Now.
Same old fan brush, and I'm going to go into a little bright red and white, something like so.
Okay, good.
Now then, see if that stands out enough.
Sometime you have to sorta check to make sure it stands out just right.
But we'll come right down in here and and we'll put in another little cloud.
There.
He just sorta lives right out in here.
And same thing once again, we'll take a light color, this is that same color, and we'll just highlight this cloud a little.
Just to give him a little flavor.
Don't want too much here.
Just a little.
But it's fantastic how you can play back and forth with these little colors and make this thing work.
There.
Back to our two-inch brush.
But notice that we're only doing one cloud at a time.
Sometimes it starts working so good you get greedy and you want to do 'em all at once.
But you need to work in your layers.
That way it works a lot better.
Okay.
Back to our color here.
We have our original color alizarin crimson and yellow, yellow ochre.
I want to make another one of those peachy clouds.
That live, yep, right there.
There we go.
Just wherever you think they should be.
That's exactly, exactly where they should be.
Because this is your world here, and you can do anything in this world that you want.
Take off the excess, blend it in.
And it's just playing back and forth here, back and forth.
There.
And we'll put a little highlight on that rascal.
Don't need much though.
Don't need but a tiny, tiny bit.
And then fluff him a little.
There we go.
Okay, now then.
Maybe in our world, there lives another little pinkish cloud, same old bright red.
And I'm just doing layer after layer of clouds here.
I want to have a lot of clouds.
A lot of clouds.
So here they come.
One after the other.
There.
Same thing again, a little bit of light color.
Just to flavor it.
Mmm.
This is going to be a beautiful little pastel painting I think.
It looks like it's going in that direction.
And they're so pretty.
I beat the brush just to knock any excess paint that's on it.
This is the same one that I blended with since the beginning.
So I just beat it to knock out the excess paint.
I'm lazy and it's easier than going through the whole blending procedure.
Alright.
Now, let's take, we'll take a little of the phthalo blue and the alizarin crimson, and just mix a little on the brush.
Heck, I just want a little tiny bit here.
A lot of the color.
But this time I'm going more to the red side.
And down in here, let's put in some little cloud shapes that just float around down in here for this lavender.
Using the corner of the brush, making little tiny circles.
Tiny little circles, there you go.
Just drop 'em in.
Let 'em go.
There, a little bit more color on the brush.
And we'll put some right over in here.
Notice it's getting darker and darker as we get away from the sun in this because that's the light source.
Everything gets darker as we work our way from that.
There we are.
Okay.
Shoot, when we have that color maybe up here in the sky, there's a little floaters that live up here too.
Don't leave the top out.
I almost got carried away there.
So we'll put a couple little floaters up in there.
Maybe even, yeah why not we don't want the top left out here, we'll just have little floaters on both sides.
And very lightly.
There we go.
Something about like so.
You know in one of the earlier shows, while I'm doing this cause I'm just doing the same thing.
One of the earlier shows I showed a little deer, that I had the opportunity to meet.
And we got so many calls about that little rascal.
I'm gonna show him to you again, see if you like this little devil.
He is one of the most precious little creatures that you could ever imagine.
And I had the opportunity to spend a, about half a day with him.
And Diana Schaffer, the bird-lady here in Muncie was taking care of him.
But isn't he a gorgeous little character.
[laughs] I tell you, you could fall in love with these, and you know I just don't have the heart to shoot Bambi anymore.
Once you hold one of these, you just, your deer hunting days are over.
Or at least for me it is.
I get so attached to 'em, I just want to keep 'em as pets.
Move them right in the house.
I've got enough creatures in the house now.
That's all I need is a deer running around in the living room.
There we are.
I'm just putting in some little sky things here while you're watching that.
Same procedure, I'm not doing anything different.
And we had to, had to give him a little drink and you notice how big that bottle was.
I think there was a coke bottle he was drinking out of.
I sure hope you enjoyed seeing him again.
Okay, got a few little clouds here and there.
But see how that dark color and I just highlighted it with the same color but it makes so many different planes in here.
The distance is so great.
I only need a little of that same highlight color.
Just basically bright red and a little white.
That's all I'm using.
And we'll just sorta highlight these little things up here on top too.
We don't want them left out.
Shoot, nothing worse than a mad cloud.
There.
And with a big brush, just gently blend that.
That's all you have to do.
That sorta brings it all together and makes some very effective little clouds.
Time to wash a brush or two.
As you know, this is my favorite thing.
[laughs] Because I get even with the crew for picking on me here.
Maybe we'll do two.
Really get 'em.
There, and we wash our brushes with odorless paint thinner.
And just beat the devil out of them to dry 'em.
It's important that these brushes are dry.
Now maybe we'll have some water back here.
Normally if you've painted with me before, I do the bottom of these with liquid-clear.
And I do that when I don't want to dilute color.
Today I want to dilute color, I want the, I want this to be much softer.
So all you have to decide where your horizon's gonna be, take your brush, and pull across.
Or you can do like we do in some of the other ones, take masking tape, and put across there so you have a nice perfectly straight line.
But what the heck.
You can just take the brush and do it.
Either way.
A little bit more color.
There we go.
And I thought, as I say, I thought today we'd just do more of a Florida-type seascape.
Instead I like to do the ones from the West Coast where you have big rocks and cliffs, and crashing waves.
But let's just do a little quiet one today.
My friends in Florida have got onto me because I haven't done many Florida seascapes.
There.
So we'll take, now that the brush is going, put a little crimson right on the same brush.
And you'll add it right in here.
Just alizarin crimson right on the same brush.
So we have a lavender, to the reddish side now.
A little more of the crimson.
Whew, ooh that's nice.
Okay, that makes it very pleasant.
And just sorta blend 'em together.
Now then.
Have to make some big decisions.
Let's figure out first of all, where our major waves are gonna be.
If we're gonna have a little, a little crasher.
Come right up in here, let me show you how to get that, just figure out basically where it's gonna be.
And I take just a little white paint on the fan brush or the script liner brush, and lay in a basic shape for the major wave.
And other than that, we don't much care.
Other than that, that's our main point.
Just take white paint, lay that little rascal in.
Now your wave's gonna crash over like that.
If that helps you, put a little doer in there like that.
In the background back here, a little white on the brush.
We can just begin putting the indication of all kind of little things.
Use a little rocking stroke, and I'm really exaggerating there.
But, so it gives the impression of little waves that are happening way back in there.
There.
Let all these little things just happen.
But don't kill all your dark color.
If you kill all the dark color, of course you don't have any dark left.
There we are.
And we just let it go on right over there.
Now here I'm just gonna blend that paint back.
Just blend it back.
But it's most important that you save a dark area right there.
Most important.
That gives the trough in between the little waves.
Since this is going to be a Florida-type seascape, we don't want a lot of crashing waves here.
Waves are pretty calm in Florida.
Unless you have one of the big hurricanes that come.
[chuckles] Then they get a little wild.
Alright.
Now.
This water's gonna come here and just sorta crash over.
Not a big crash, just a little crash.
Something like so.
There we go.
Tell you what, let me grab a Filbert brush, I like him for this.
Put a little titanium white on that little Filbert brush and let's begin making some little, little things that are crashing up here.
[Bob makes "tch" sound] Gotta make those little noises.
Put a little, let's put a little lavender on.
Make a shadow, for our little crasher.
This is just phthalo blue a little alizarin crimson, maybe, a least a little touch of black in there too.
Yeah, there we go, I like that.
Sorta let that come right on around.
Wash the old brush.
Now these brushes we just dry on a paper towel.
It's sorta hard to beat them.
There's not enough to get in there and work with.
Back to titanium white.
There.
Now we can highlight that.
Just give it a little upward push.
Something like so.
And then very gently, again blending that together a little.
Okay.
Let's take a little one-inch brush, and very lightly go in here, just the corner, and just blend that together.
You can make it as soft as silk.
There we are.
Very light.
Now.
Let's take some white, least little touch of the cad yellow mixed together, just white, a little cad yellow, I'll use a little fan brush but you can use anything, it doesn't matter.
We'll go right up in here, this is the eye of the wave, or the transparency, whatever you want to call it.
Let's just put in a little color right in there and let it blend outward so there's a little light zinging through the water.
Now the blue and the yellow here will mix together, and make it a very nice green color.
Now with a nice, you could use a one-inch or a two-inch to do this.
Just gently blend it, just blend it in little tiny circles, till it all comes together.
And there, so now we have a little eye.
Let's have some fun.
Shoot, I'll take a little knife, and a little touch of the titanium white.
And in my mind, we have a little ripple right there.
We put it on with a knife.
I'm using a lot of pressure, a lot of pressure.
You can put in a few little things like that.
There's a little cad yellow in there, a little bright red too sometime.
Just sorta let all those colors just happen.
There.
Now with a clean fan brush, very lightly, you grab that, and take it back.
Try not to destroy that nice edge.
Just take it back.
And again blending it together.
This is where you make the shape of the wave.
The curl.
Whatever you want to call it.
Now sometimes it's fun, right underneath our light source here, take pure white, pull down.
Just pull it down.
Very firmly.
And then go across.
Like that.
Now back to our little knife.
Redefine that edge, I sorta messed it up.
And let's have another little ripple that lives right about here.
We go right over that spot that looks like a reflection, and it's gorgeous.
because you'll be able to see that right through there.
And people will wonder, "How in the world did you done that?"
And it's so easy, it really is easy.
And, find me a clean fan brush and I'm about out of them.
Let me wash one.
And very gently, blend that back.
But you need a clean brush.
Very lightly, and do this as gently as you can.
You don't want to destroy these nice shiny areas that you have in your water here.
So be careful, don't destroy those.
Now then.
Okay, we can take our little liner brush, a little bit of white on it, and here and there.
This is, you can begin bringing all this together.
All kinds of little lines and ripples and things going on.
Wherever.
But this is where you really begin forming and shaping your way, a little dark line underneath there will separate that.
A few little things that you can see through, the transparency.
There.
And at home, when you're doing this, put a lot of these little rascals in here.
They'll really make your painting special.
There we go.
now then, let's take, let's have a little sand dune today.
What the heck.
For that, I'm gonna take black, black, black, black, a little bit of, let's get a little bit of that Van Dyke brown, maybe a little dark sienna, and some white.
I wanna brownish-gray color, maybe a little crimson in there too.
Oh that's better, that's much better.
Almost a, yeah something like that.
Now that, let's decide where our little sand dunes live.
Maybe, yeah there you go.
We can just put in a basic shape here.
That's all we're looking for.
Wherever.
Maybe he's got a friend right there.
And just paint over anything that's there.
Don't worry about it.
You haven't wasted your time if you learned to make these.
Maybe that comes right on down there.
So we just see a little bit of it through.
There we go.
Just put a little color in there.
And that's only so our lighter color will show.
Now.
Take a little touch of white, and it's got the least little bit of that bright red, the least little bit.
Pull it out, get our little roll of paint, and very lightly just barely grazing it.
Figure out where the little tops are in your sand dunes.
Wherever you want 'em.
There.
See.
Maybe they come right on down through there.
I don't know.
Wherever, wherever.
Maybe there's a little, yeah, right in there somewhere.
See, but barely touching, just let the paint break.
Let it break.
There.
Here and there I'm gonna add a least little touch of like a lavender shadow here and there.
Just to sparkle it up some.
Okay, now that we can take the fan brush, we'll put a little sap green on it, a little green, a little bit of brown, and I want to go right in here, and just pop in some little things.
I'm gonna add a little paint thinner to that.
I want it a little thinner.
A little thinner, yeah.
Just pop in some little doers like that.
This is gonna end up being some little weeds up here.
Maybe in our world, yep, right in here we'll have one coming right over.
Wherever you want 'em.
Wherever, we'll put some right up in here.
Let them follow right down.
There's one.
But this paint's a little bit thinner.
Put a little paint thinner in.
And I take a little paint thinner, go into the dark sienna, and back through that greenish color, but mostly dark sienna.
Let's go up in here, this paint here is thin.
So we can grab it, and start lifting upward.
And make, just the indication of some little Sea Oats and stuff that live out here.
There we go.
Something about like that.
Maybe a few over here on the other side.
And you can just take a put a little things on the end sometime, they have 'em.
That's why they call 'em Sea Oats.
It looks like a little, wheat growing out there.
Now go into a little bit of light color, this is white with a little touch of the yellow in it.
And we'll put in a few little light colored ones here and there.
We don't want them all dark.
And then they'll show up good against that.
There.
Something like so.
As many or as few as you want.
And we can just take our fan brush, a little white on it and grab the bottom of that, pull it a little, and bring all this together.
It's a very nice way of making a simple little seascape that I think you'll really enjoy doing.
Alright we'll that I think we have about a finished picture.
Let's take a contact paper off now, and see what we have.
As they say, this is the moment of truth.
And I think you'll like this one.
Try this one, let us know how you like it.
And from all of us here, I'd like to wish you happy painting, and God bless my friend.
[announcer] To order Bob Ross' 256 page book with 60 Joy of Painting projects or his Four Seasons DVD set, call 1-800-Bob-Ross or visit BobRoss.com [music] [music]


Distributed nationally by American Public Television